How to Mounting CD-ROM for Make Repository Local in RHEL 7
 |
| How to Mounting CD-ROM for Make Repository Local in RHEL 7 |
How to Mount CD-ROM for Make Repository Local in RHEL 7 - All files accessible in a Unix system are arranged in one big tree, the file hierarchy, rooted at /. These files can be spread out over several devices. The mount command attaches the filesystem found on some devices to the big file tree. Conversely, the umount command will detach it again.
In the ever-evolving landscape of Linux administration, mastering the intricacies of .iso CD mount to create a local repository is a skill that can significantly enhance the efficiency of your Red Hat Enterprise Linux 7 (RHEL 7) system.
As technology advances, the need for streamlined processes becomes paramount, and creating a local repository offers a practical solution. In this article, we will delve into the step-by-step guide on how to mount a CD-ROM effectively, empowering you to establish a local repository seamlessly.
Whether you're a seasoned sysadmin or a Linux enthusiast exploring new horizons, this tutorial will provide valuable insights into optimizing your RHEL 7 environment. Let's embark on this journey to harness the power of local repositories for a more robust and efficient Linux system.
Preparation
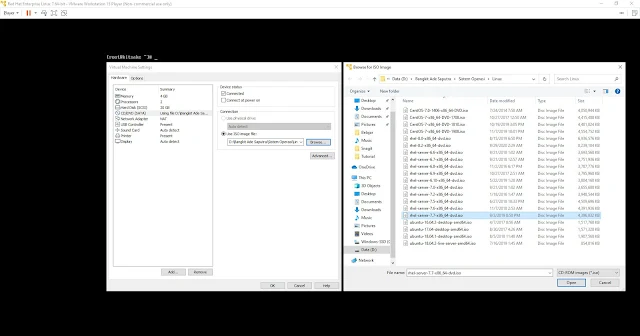
For this simulation, I will use the VM-Ware for my Workstation, and don't forget to insert .iso to this VM, below is the capture mount works.
 |
| .iso CD mount |
Configure
Below we will carry out 2 core configurations, namely mounting the .iso which was done in the previous step and is called in the configuration file with the extension .repo
1. Mounting
after that .iso connected can you see in VM too with the command
# mount -t iso9660 /dev/cdrom /media
# ll /media
If using iso dvd, mount the iso with the following command:
# mount -o loop filename.iso /mnt/cdrom
(replace filename.iso according to the file used, for example: rhel7.iso)
2. Set up local.repo
Next, we set up the config for this repo with this script
# vi /etc/yum.repos.d/local.repo
[RHEL7]
name=Red Hat 7.7 Enterprise Linux Installation DVD
baseurl=file:///media/
enabled=1
gpgcheck=0
Next, execute the following command:
# yum clean all
# yum repolist all
 |
| local repo |
How to make sure
For this, you just install something, In this example, I want to install a nano.
# yum install nano
 |
| installing nano |
If you have successfully installed the package as shown in the screenshot above, it means that the local repository created with the mounted CD in the VM or the above tutorial is successful, and you can proceed with your specific requirements.
Closing statement
As we conclude our exploration into the intricacies of .iso CD mount for creating a local repository in RHEL 7, the empowerment of your Linux administration skills beckons. By following the steps outlined in this guide, you not only unlock the potential for a more streamlined system but also gain a deeper understanding of the mechanisms at play.
The ability to establish a local repository is a valuable asset in your toolkit, offering efficiency and convenience in software management. So, why not take the plunge and try implementing these steps on your RHEL 7 system?
Whether you're a seasoned professional or a curious enthusiast, the journey to mastering local repositories is both rewarding and essential in navigating the dynamic landscape of Linux administration. Elevate your system's performance and experience the benefits firsthand. Happy exploring!
Maybe that's all I can share with you guys, hopefully, this article will be useful.
Thank You.


Post a Comment for "How to Mounting CD-ROM for Make Repository Local in RHEL 7"
Post a Comment