How to Install RHEL 8 in vm vSphere Client or VMware ESXi
 |
| How to Install RHEL 8 in vm vSphere Client or VMware ESXi |
How to Install RHEL 8 in vm vSphere Client or VMware ESXi - Hello everyone, welcome to the kitsake.com blog. I hope you are all doing well and always blessed with ease in everything, be it in life or work. Amen.
Are you currently looking for a topic about Linux, particularly "How to install Red Hat Linux 8 step by step?" If so, then this post is the answer.
Installing Red Hat Enterprise Linux 8 (RHEL 8) in a virtualized environment offers numerous advantages, such as resource efficiency, scalability, and cost-effectiveness. In this comprehensive guide, we will walk you through the process of installing RHEL 8 on both VMware vSphere Client and VMware ESXi.
Without further ado, you can follow the steps I have carefully laid out in this post:
Preparation before Install RHEL 8 in vm vSphere Client
Download RHEL 8 .iso from Official Website
An RHEL 8 subscription and the RHEL 8 Binary DVD .iso file, which you can get at no cost by following the steps on the Get RHEL 8 page.
Your Red Hat username and password. Your account was created during step one. You will need this to register the system and attach it to your subscription. Completing these steps is required for your system to download software from Red Hat.
Upload File RHEL 8 .iso to Datastore in vm vSphere Client
Right Click datastore – Click Browse Files – Choose Folder ISO - Upload Files - Choose rhel-8.6-x86_64-dvd.iso – Wait until it's finished
 |
| Upload File rhel-8.6-x86_64-dvd.iso |
Create New Virtual Machine in vm vSphere Client
At this stage, you will prepare a Virtual Machine that will later have Red Hat Enterprise Linux 8.6 installed on it. This will be our minimal server.
Add New Virtual Machine
Right Click at Host – choose New Virtual Machine
 |
| New Virtual Machine in vm vSphere Client |
1 Select a creation type – Create a new virtual machine - Click Next
2 Select a name and folder - Type Virtual machine name: "Kitsake" - Click Next
Note: Here, you can give your VM a name according to what you desire or its function as a server.
3 Select a compute resource - Next
4 Select storage - Next
5 Select compatibility - Compatible with : ESXi 6.5 and later - Click Next
6 Select a guest OS - Guest OS Family Linux - Guest OS Version Red Hat Enterprise Linux 7 (64-bit) - Click Next
7 Customize hardware
Note: Here you just need to fill in the hardware requirements for the VM. In this case, I will create it with low specifications because it's only for demonstration purposes.
The setup will be different when you install servers for a web server, apps server, or database server needs.
On tab virtual hardware
Here, you will configure the hardware requirements, including CPU, Memory, and Hard Disk. I will also enable the Hot Plug feature provided by VMware so that at certain times, when there is a need for additional hardware in this VM, you can add more CPUs and Memory.
CPU : Expand and Choose 2 vCPUs
CPU Hot Plug : Checklist Enable CPU Hot Add
 |
| Setup vCPU on vm vSphere Client |
Memory : Expand and Choose 4 GB
Memory Hot Plug - Checklist Enable
 |
| Setup Memory on vm vSphere Client |
New Hard disk : Type 20 GB
On tab virtual options
Expand VMware Tools - Time - Checklist Synchronize guest time with host
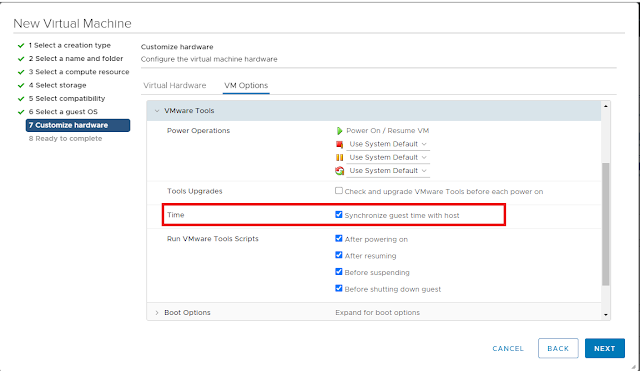 |
| Checklist Synchronize guest time with the host |
7 Customize hardware - Next
8 Ready to complete – Finish
Mounting RHEL 8 .iso in vm vSphere Client
Right Click at VM Kitsake – Click Edit Settings
CD/DVD drive 1 – Datastore ISO File – Choose rhel-8.6-x86_64-dvd.iso - Status Checklist Connect At Power On - Ok
 |
| Mounting RHEL 8 .iso in vm vSphere Client |
Right Click – Choose Power – Click Power On
Install Server OS RHEL 8 in vm vSphere Client or VMware ESXi
Open with Remote Console
I really like VMware's Firur Remote Console compared to the web console. For those of you who want to use this remote console, you need to install dependencies on your computer first.
Launch Remote Console – Web Console
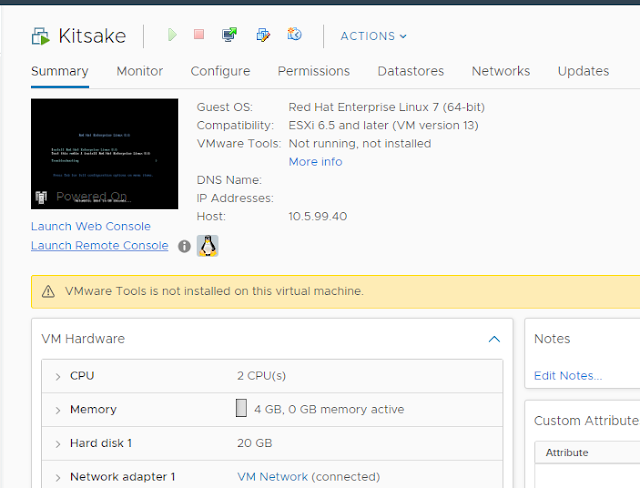 |
| Launch Remote Console |
Install Red Hat Enterprise Linux 8.6
Choose Install Red Hat Enterprise Linux 8.6 - Press Enter
 |
| Choose Install Red Hat Enterprise Linux 8.6 |
Choose Language
English – English (United States) - Continue
 |
| Choose the language would you like |
Setup Time & Date
In this clock setting, try not to delay if possible because considering that time is crucial for log recording. If the clock is not accurate, it will be difficult when you are searching for logs with timestamps that are not synchronized with your current time.
Time & Date – Region (Asia) – City (Jakarta)
 |
| Time & Date |
Software Selection
What I recommend is choosing the minimal install option. This is because only essential packages are installed, which typically include the core components of the operating system, essential system utilities, and basic networking tools. This minimal installation ensures a smaller footprint and reduces potential security risks since fewer packages are included by default.
Overall, the "minimal server" option in RHEL 8 provides a lightweight and efficient foundation for setting up a server with reduced overhead and fewer unnecessary components
Software Selection – Choose Minimal Install - Click Done
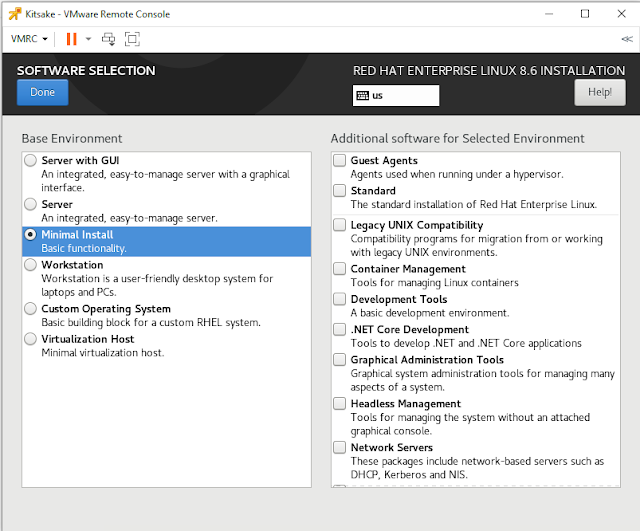 |
| Minimal Install |
Installation Destination
Installation Destination – Checklist Custom - Click Done
 |
| Installation Destination |
Manual Partitioning
In this step, I usually create the partitions automatically first and then edit them manually until I find the right composition.
Click here to create them automatically - Click Done
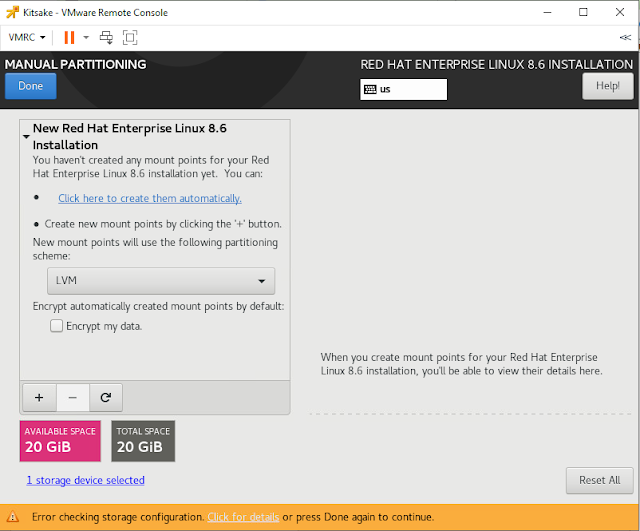 |
| Click here to create them automatically |
Create partitions according to the needs of the application. When you have ample space, you can create multiple partitions. In my case, I only need the /root partition, as this guide is specifically for installing RHEL with minimal server configuration for this post.
Click Done - Click Accept Changes
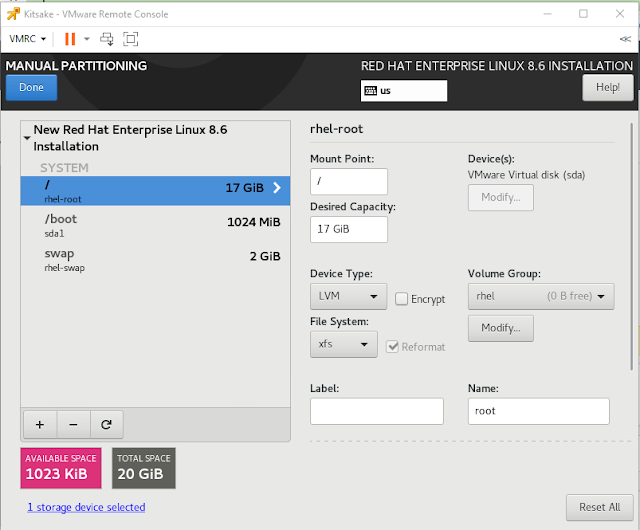 |
| Manual Partitioning |
Click Done - Click Accept Changes
Network & Hostname
If you already have a Hostname for this new RHEL Server, Input the Hostname in the [Host Name] field. (possible to set it after installing)
Input Host Name : type kitsake - Click Apply
And then we will set up the IPv4 for this server:
Click Configure - Choose tab IPv4 Setting - Expand Method and choose Manual - Click Add - Input Address - Input Netmask - Input Gateway Input DNS Servers
And here, I also set up the IPv6 to be disabled.
Choose tab IPv6 Setting - Expand Method and choose Disable - Click Save - Click Done
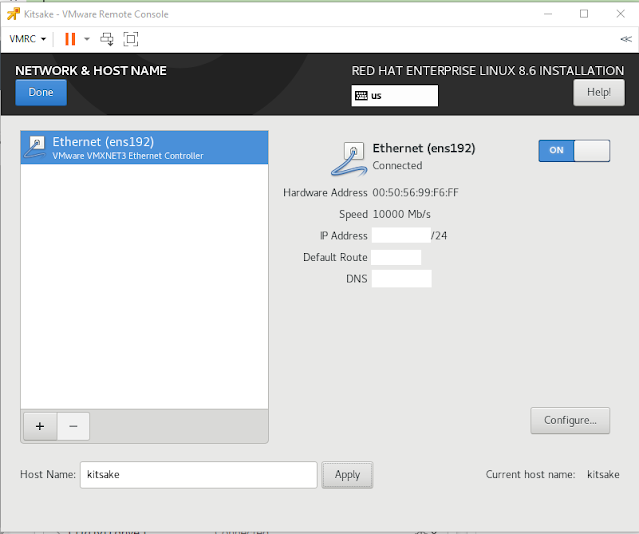 |
| Network & Hostname |
Root Password
Provide your best password, one that is undoubtedly very secure, as a password is the most crucial aspect. You can also create it using a password generator to make it more unique and challenging, known only to you, and be sure to keep it safe.
Click Root Password - Input Root Password - Confirm Root Password - Click Done
 |
| root password |
Installation Progress
Yes, the final step after configuring all the requirements of the RHEL 8 operating system is to proceed with the installation and format the configured system to become the coolest OS.
Click Begin Installation - Wait until it's finished - Click Reboot System
 |
| Reboot System |
Login Prompt
After restarting the computer, the login prompt is shown as follows. Login with the root user or a common user you set during the installation. If logged normally, RHEL 8 Installation is successfully finished.
 |
| login prompt |
FAQs
Q1: Can I install RHEL 8 on VMware Workstation instead?
Yes, you can install RHEL 8 on VMware Workstation by following a similar process. However, for this guide, we focus on installing RHEL 8 on VMware vSphere Client or VMware ESXi.
Q2: What are the minimum system requirements for RHEL 8?
The minimum system requirements for RHEL 8 are:
- Processor: 1.5 GHz or faster multi-core processor
- RAM: 2 GB
- Disk Space: 25 GB
And that concludes my post about How to Install RHEL 8 in VM vSphere Client or VMware ESXi. I hope this post can serve as a reference for you when you want to install RHEL 8 operating system.
Maybe that's all I can share with you guys, hopefully, this article will be useful.
Thank You.


Post a Comment for "How to Install RHEL 8 in vm vSphere Client or VMware ESXi"
Post a Comment