How to Setting Security Headers Nginx to Make Score to A
 |
| How to Setting Security Headers Nginx to Make Score to A |
How to Setting Security Headers Nginx to Make Score to A - Setting up security headers in Nginx to achieve an A score is crucial for ensuring robust protection against various web vulnerabilities. Many users might find configuring these headers daunting, but here, we'll provide a straightforward guide.
In this tutorial, we'll focus on Nginx, implementing the changes within the Nginx virtual host (vhost) configuration. To illustrate the importance of this setup, let's consider an example where an application lacks proper security header configurations, resulting in a dismal F score when analyzed using tools like "Analyse your HTTP response headers."
Cause
Many of you may not know how to configure Security Headers, here I will tell you how to do it simply and clearly. here I use nginx, so I will implement it in vhost nginx.
Here I will give an example of my application that has not configured its security headers and is scanned at "Analyse your HTTP response headers" It gets an F value and of course, it's very bad.
 |
| Score of my application before |
Resolution
Login SSH to your Server and then enter to directory where the location of host nginx, I'm configure my vhost in the directory /etc/nginx/site-enables/
# cd /etc/nginx/site-enables/
Edit the host, in the vhost configuration I only call the header that I will create with the name kitsake-header.conf in the directory /etc/nginx/conf.d/header/
# vi kitsake.conf
server {
.................
include conf.d/header/header-kitsake.conf;
................
}
And now it's time to create a file so that the security header changes its value to be better
# cd /etc/nginx/conf.d/
# mkdir -p header
# cd header/
# vi header-kitsake.conf
add_header X-XSS-Protection "1; mode=block";
add_header X-Content-Type-Options nosniff;
add_header "Referrer-Policy" "strict-origin";
add_header X-Frame-Options SAMEORIGIN;
add_header Strict-Transport-Security "max-age=31536000; includeSubDomains";
add_header X-Permitted-Cross-Domain-Policies master-only;
add_header Feature-Policy "geolocation none;midi none;notifications none;push none;microphone none;camera none;magnetometer none;gyroscope none;speaker self;vibrate none;fullscreen self;";
add_header Public-Key-Pins 'pin-sha256="your public key existing"; pin-sha256="your public key backup / old"; includeSubdomains; max-age=31536000' always;
add_header Permissions-Policy "geolocation=(self https://yourdomain.com), microphone=()";
make sure your configuration is true and not an error
# nginx -t
nginx: the configuration file /etc/nginx/conf/nginx.conf syntax is ok
nginx: configuration file /etc/nginx/conf/nginx.conf test is successful
And it's time to apply the results of the configuration that was made earlier
# systemctl restart nginx
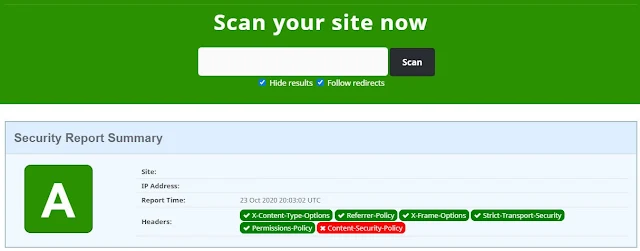
Scan / Test the Application again at the Security Header again and see the result
 |
| the result of the configuration |
 |
| detail information |


Post a Comment for "How to Setting Security Headers Nginx to Make Score to A"
Post a Comment