How to Increase root Partition Capacity on ESXi VM CentOS 7
 |
| How to Increase root Partition Capacity on ESXi VM CentOS 7 |
How to Increase root Partition Capacity on ESXi VM CentOS 7 - Hello everyone, welcome to kitsake's blog. I hope you are all in good health. In this post, we will learn how to increase the root partition capacity on ESXi VM CentOS 7 Linux using the 8e Linux LVM (Logical Volume Manager).
Introduction
You may have encountered a situation where your disk is always full, and cleaning up data in the root partition is no longer possible. In such cases, you need to increase the disk space on the root partition. To learn how, you can follow this tutorial.
Precaution and Backups
Before making any changes to your VM, it's crucial to back up your data. This ensures that you have a safety net in case anything goes wrong during the process.
Step-by-Step Guide
Step 1: Capture before changes
Always create a report when working on system-related tasks to compare before and after changes. In this case, we'll check the disk size before adding more disk space using the following commands:
# df -h
 |
| Show information about the file system |
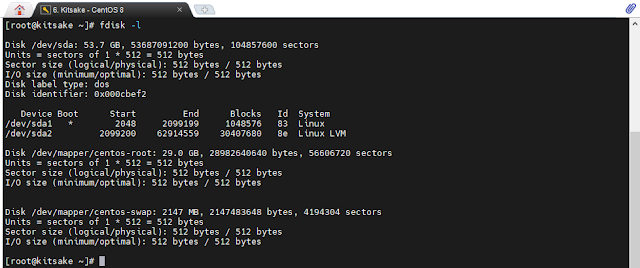
# fdisk -l
 |
| Display or manipulate a disk partition table. |
Step 2: Adding disk space in VMware
Next, we'll take action in VMware by increasing the size of the hard disk 1. Enter the required size; for example, I'll increase it from 30 GB to 50 GB.
# In the VMware vSphere Client, select your ESXi VM CentOS 7 and go to "Edit Settings." Locate the virtual disk you want to extend and increase its size.
 |
| Before increase Hard disk |
 |
| After increase Hard disk |
Step 3: Detect the new disk space
After adding the disk at the VM level, the next step is to enter CentOS 7 to proceed further. There are two ways to rescan, with or without a system restart.
In this case, I'll perform a system restart because the rescan without restart didn't work for me. Here's how:
Rescan device without restart:
# echo "- - -" > /sys/class/scsi_host/host1/scan
Note: You may need to change 'host1' depending on your setup.
Rescan device with restart:
# reboot
Check the result of the rescan using the following commands:
# fdisk -l
 |
| Display partitions and exit |
# lsblk
 |
| List information about block devices |
Step 4: Add a new partition
Once the added size appears in the system, we need to configure it to enter the intended partition.
Add a new partition:
# fdisk /dev/sda
type n - press enter - press enter - press enter
 |
| fdisk /dev/sda |
change a partition type:
type t - type 8e
 |
| change a partition type |
write table to disk and exit:
type w
 |
| write table to disk and exit |
You will see a warning that a system reboot is required to apply the new table with changes.
Step 5: Check new partition
You can see the partition you added in the previous step. Here, I'm adding commands to print a summary of the contents:
# partprobe -s
If the new partition does not appear, you can restart the system first:
# reboot
Then, check the block device information again:
# lsblk
# fdisk -l
 |
| check the block device information |
Step 6: Initialize physical volume(s) for use by LVM
Next, we'll install the partition and add it to the Volume Group (VG) used for the root partition:
# pvcreate /dev/sda3
 |
| pvcreate /dev/sda3 |
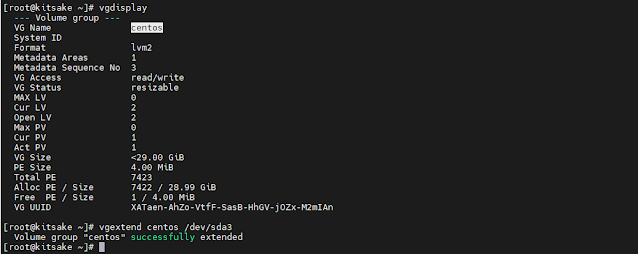
Retrieve the data needed for the next step. Here, we need to know the VG name:
# vgdisplay
# vgextend centos /dev/sda3
 |
| vgdisplay |
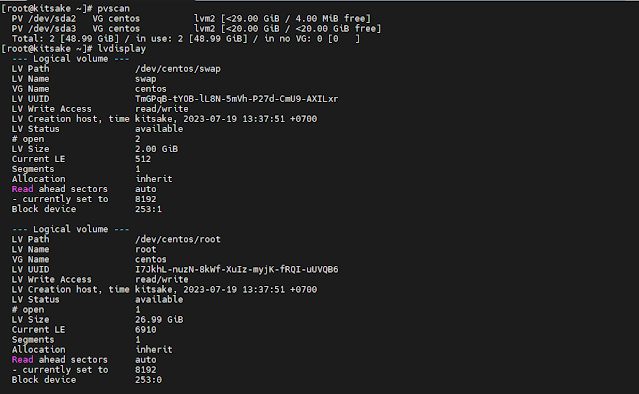
Next, get the data about the logical volume (LV) path:
# pvscan
# lvdisplay
 |
| lvdisplay |
With the LV path known, we'll proceed to extend the root partition with the new partition we created earlier:
# lvextend /dev/centos/root /dev/sda3
| lvextend |
For XFS file system (default in RedHat/CentOS 7), you can grow the file system using "xfs_growfs". Execute the command and see the result of the grown root partition:
# xfs_growfs /dev/centos/root
# df -h
 |
| xfs_growfs |
Closing statement
Expanding the root partition capacity on your ESXi VM CentOS 7 is a critical task to maintain the smooth operation of your virtual machine. By following our step-by-step guide, you can do this without any data loss. Remember always to back up your data and perform these operations carefully.
Now you have the knowledge to ensure your CentOS 7 VM runs efficiently without disk space constraints. Happy virtualizing!
Maybe that's all I can share with you guys. Hopefully, this article will be useful.
Thank you.


Post a Comment for "How to Increase root Partition Capacity on ESXi VM CentOS 7"
Post a Comment