How to Install SQL Server Standard Edition 2019 on Windows
 |
| How to Install SQL Server Standard Edition 2019 on Windows |
How to Install SQL Server Standard Edition 2019 on Windows - Hi friends, welcome back to kitsake.com blog. In this occasion, I will share an article about the guide for installing SQL Server Standard Edition 2019 on Windows Server 2019.
Installation
SQL Server Standard Edition 2019 itself is one of the database software widely used by companies around the world. It is known for its powerful relational database management system that offers enhanced performance, security, and scalability. By following the steps below, hopefully, you will be able to install and utilize it effectively.
Step 1: Download SQL Server Standard Edition 2019
Before we begin the installation process, you are required to download the installer. In this example, I am using SQL Server that I downloaded using the license purchased by my company. If you are a student, you can download the SQL Server Express version instead.
For SQL Server download, you can visit its official page on Microsoft's website here. Choose the express version for practice purposes.
 |
| SQL Server download |
Step 2: Launch the SQL Server Installation Wizard
Once you have downloaded the SQL Server installation files, locate the setup executable and run it. The SQL Server Installation Wizard will guide you through the installation process.
 |
| Locate the setup executable and run it |
SQL Server Installation Center : Click New SQL Server stand-alone installation or add features to an existing installation
SQL Server 2019 Setup : Checklist Enter the product key: xxxx-xxxx-xxxx-xxxx - Next
 |
| Enter the product key |
To obtain a license, you can purchase it from Microsoft. If you download SQL Server using a registered account, the product key is usually automatically filled during the installation process.
License Terms : Checklist on I accept license term and Privacy Statement - Next
Microsot Update : Unchecklist on Use Microsoft Update to Check for updates (recommended) - Next
Here, I uncheck the update option because I am installing it for a production server where internet access is restricted for security purposes. In most cases, installations on production servers are done using the offline method.
Product Update : Click Next
Feature Selection : Click Select All - Scroll Down - Unchecklist PolyBase Query Service for External Data - Next
 |
| Feature Selection |
Step 3: Configure Server
In this step, you can choose to configure server settings such as authentication mode, collation, and file locations. Make the necessary selections based on your requirements and click "Next."
Instance Configuration : Click Next
Java Install Location : Checklist Install Open JRE 11.0.3 included with this installation - Next
Server Configuration : Click Next
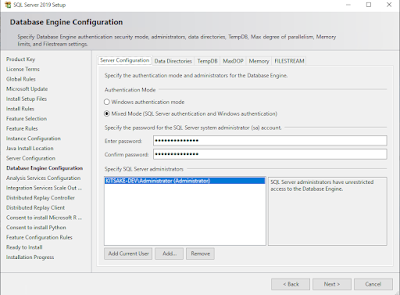
Database Engine Configuration : Checklist Mixed Mode (SQL Server authentication and Windows authentication) - Enter Password - Click Add Current User - Next
 |
| Database Engine Configuration |
Analysis Service Configuration : Click Add Current User - Next
Integration Services Scale Out Configuration - Worker Node : Clik Next
Distributed Reply Controller : Click Add Current User - Click Next
Distributed Reply Client : Click Next
Consent to install Microsoft R Open : Click Accept - Click Next
Consent to install Python : Click Accept - Click Next
Offline Installation of Microsoft Machine Learning Server Components : Click Browse - Click Next
 |
| Offline Installation of Microsoft Machine Learning Server Components |
Step 4: Ready to Install
You are required to download the file provided by Microsoft from the given link. Download it and input it into your machine for the SQL Server 2019 installation process to proceed.
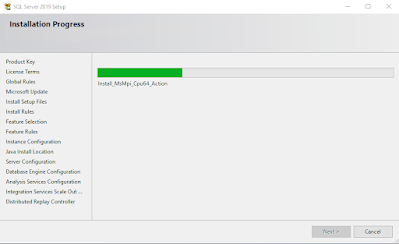
Ready to Install : Click Install
 |
| Installation Progress |
Yes, next we just have to wait for the process to complete.
Complete : Click Close
 |
| Complete the Installation |
Trying Login with Favorite Editor
Yes, the installation process has been successful. Next, you just need to try logging in using some tools that you prefer. Some tools that I recommend are Microsoft SQL Server Management Studio and HeidiSQL. Here are some examples:
Microsoft SQL Server Management Studio with Azure Data Studio
Open SSMS - Input Server Name with IP Address - Input Login User - Input Password - Click Connect
 |
| SMSS Connection |
 |
| Successfully logged in to SQL Server using Microsoft SQL Server Management Studio |
HeidiSQL
Open Heidi - Input IP Address - Input User - Input Password - Click Open
 |
| HeidiSQL Connection |
 |
| Successfully logged in to SQL Server using HeidiSQL |
Well, that's probably all I can share with you about the process of Installing SQL Server Standard Edition 2019 on Windows Server 2019. Maybe that's all I can share with you guys, hopefully this article will be useful.
Thank You.


Post a Comment for "How to Install SQL Server Standard Edition 2019 on Windows"
Post a Comment