How to Setup Replicate MySQL on RHEL 7
 |
| How to Setup Replicate MySQL on RHEL 7 |
How to Setup Replicate MySQL on RHEL 7 - Replicating MySQL databases is a crucial aspect of ensuring data availability, reliability, and scalability in modern database management.
The process of MySQL replication involves creating and maintaining duplicate copies of a database to enhance data redundancy and fault tolerance. This technique enables organizations to distribute workloads, enhance system performance, and create robust backup mechanisms.
By replicating MySQL databases, businesses can achieve high availability, reduce the risk of data loss, and improve overall system resilience.
Whether for disaster recovery, load balancing, or ensuring data consistency across distributed environments, MySQL replication stands as a fundamental strategy for optimizing database performance and safeguarding critical information.
Preparation
Okay, in this article I want to share how to set up replication MySQL in RHEL 7, I hope you enjoy my explanation. here, I have 2 servers to make 1 Server for the Master and 1 More to be a Slave :
- Server 1 [Master]: 192.168.79.130
- Server 2 [Slave]: 192.168.79.138
Configure
1. Master Server
For the first step, you must edit /etc/my.cnf for this master worked
# cp /etc/my.cnf /etc/my.cnf.ori // for backup
# vi /etc/my.cnf
Fill in the settings as below.
[mysqld]

........

........

# replication

server-id = 1

log-bin=mysql-bin
 |
| my.cnf be master |
for apply that configuration you must restart mysqld
# systemctl restart mysqld
You must have one or more databases to replicate, and this time I want to create three databases in the master server.
# mysql -u root -p
> show databases;
> create database bangkit;
> create database ade;
> create database saputra;
 |
| create databases |
After creating the database you must create a user for this feature (replicate) and just allow access from the ip slave server
> create user 'repuser'@'192.168.79.138' identified by '123!@#QwE';
> grant replication slave on *.* to 'repuser'@'192.168.79.138';
> flush privileges
Backup database and copy that database to slave server with scp or other
# mysqldump -u root -p --skip-lock-tables --single-transaction --flush-logs --hex-blob --routines --opt --all-databases > all_databases.sql
# scp all_databases.sql root@192.168.79.138:/home/kitsake
 |
| backup databases and transfer to slave server with scp |
2. Slave Server
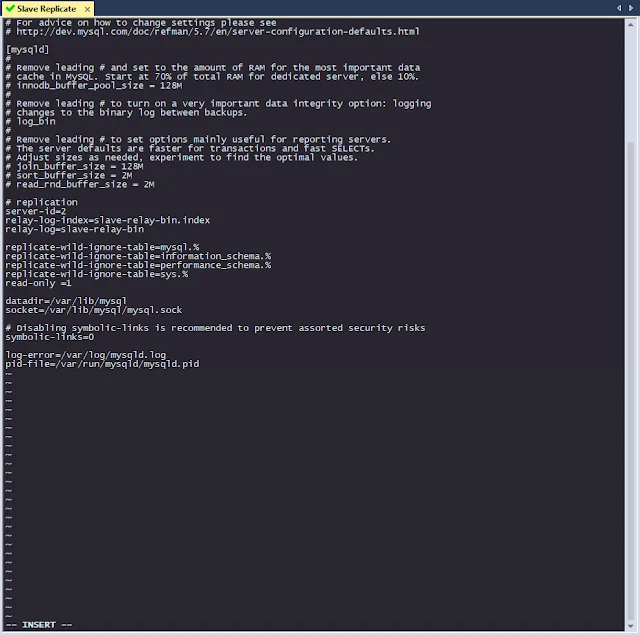
Like a first step in configuring the master server, at this moment you must edit /etc/my.cnf on the slave server, but here I exclude the database no needed.
# cp /etc/my.cnf /etc/my.cnf.ori // for backup
# vi /etc/my.cnf
Fill in the settings as below
# [mysqld]

........

........

server-id=2

relay-log-index=slave-relay-bin.index

relay-log=slave-relay-bin


replicate-wild-ignore-table=mysql.%

replicate-wild-ignore-table=information_schema.%

replicate-wild-ignore-table=performance_schema.%

replicate-wild-ignore-table=sys.%

read-only =1
 |
| my.cnf be slave |
To apply that configuration you must restart mysqld
# systemctl restart mysqld
Restore the database
# mysql -u root -p < all_databases.sql
3. Master & Slave Server
In Master Server [192.168.79.133] you must see the information binlog
# mysql -u root -p
> show master status;
and put to your notepad that information is showing will need to be set up in the slave server
The next step is to insert the binlog from the Master Server to this Slave Server [192.168.79.138]
# mysql -u root -p
> stop slave;
> CHANGE MASTER TO MASTER_HOST='192.168.79.133', MASTER_USER='repuser', MASTER_PASSWORD='123!@#QwE', MASTER_LOG_FILE='mysql-bin.000001', MASTER_LOG_POS=154;
> start slave;
 |
| show binlog and start slave |
Finally, this step to replicate is done, and see whether the replication worked or not type this command at the Slave Server
> show slave status \G;
 |
| show slave status |
on this picture any three points:
Slave_IO_State: Waiting for master to send event
Slave_IO_Running: Yes & Slave_SQL_Running: Yes
Seconds_Behind_Master: 0
Closing statement
In conclusion, by following the step-by-step tutorial provided above, you've successfully navigated the intricacies of setting up MySQL database replication in a master-slave configuration.
This robust configuration not only enhances data distribution but also ensures the resilience and scalability of your database infrastructure.
As you embark on your journey with MySQL replication, you now possess the knowledge to optimize data management and foster a more reliable and efficient database environment. Happy replicating!


Post a Comment for "How to Setup Replicate MySQL on RHEL 7"
Post a Comment