Configuration Before Building the Webserver on RHEL 7
 |
| Configuration Before Building the Webserver on RHEL 7 |
Configuration Before Building the Webserver on RHEL 7 - Hello everyone, welcome to the kitsake.com blog. I hope you are all doing well and always blessed with ease in everything, whether life or work. Amen.
Are you currently looking for a topic about Linux, particularly "What should be done after you install the Linux RHEL 7 operating system?" If so, then this post is the answer.
In this post, I will share some things that need to be configured before this server is run and used by many people when turned into public apps. So, what are they? Below, I'll explain the details and how to do it.
Disable SELinux in Server RHEL 7
Perhaps some of you may disagree when disabling Selinux, while others may agree. For me personally, Selinux is indeed good for its security, as everything needs to be whitelisted to be accessed.
However, it can be too complicated. That's the reason why I disable it to avoid troubling myself, especially since some of you may not be familiar with Selinux knowledge itself.
Now, to do it, you can follow the steps below to disable SELinux:
Check Selinux status
First, you need to check the status of SELinux. Typically, when the OS is still fresh or newly installed RHEL 7, the status is enforced.
This check can also serve as a reference point for you to know the differences after you modify SELinux.
# sestatus
Change the Selinux setting so they are not active
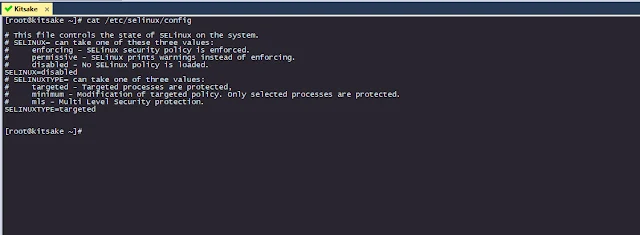
After you know the SELinux status, you can modify it in the SELinux configuration file to disable it.
# vi /etc/selinux/config
 |
| disable SELinux |
and then change in the SELINUX=enforcing to SELINUX=disabled then - Save & Close
So, that's how you do it, but our previous configuration changes have not been fully applied because modifying the SELinux configuration file requires a server restart. However, do not restart yet, as we will do it in the final step because we will continue with setting up several services.
Disable Firewall in Server RHEL 7
Firewalld provides a dynamically managed firewall with support for network/firewall zones to define the trust level of network connections or interfaces. It has support for IPv4, and IPv6 firewall settings, and for ethernet bridges and has a separation of runtime and permanent configuration options. It also supports an interface for services or applications to add firewall rules directly.
The explanation above is obtained on a global scale. This is also similar to the Selinux service, which can be quite complicated to implement on the server. But if you don't have a firewall layer above the server, I suggest you enable Firewalld. In most cases and many companies, they already have firewall devices, so I turn it off at the OS level.
Turn off the firewall in Linux
# systemctl stop firewalld
Disable to automatically turn on when booting
And type the command below to ensure that the Firewalld service will not be running after the system restarts. This is because, when it starts running again, ports or services within your system that have not been registered in Firewalld will not function properly.
# systemctl disable firewalld
Change the default port of ssh
Alright, next, we will change the default SSH port, which is port 22. This will be even more effective when combined with custom NAT on network devices. It enhances security, making it harder for external parties to penetrate our server. Here are the steps:
# vi /etc/ssh/sshd_config
 |
| custom port for SSH |
and then change the #Port 22 to Port 1234 (whatever you want) then save & close
Make Banner on Server and will display when starting ssh
The contents of /etc/motd are displayed by login(1) after a successful login but just before it executes the login shell.The abbreviation "motd" stands for "message of the day", and this file has been traditionally used for exactly that (it requires much less disk space than mail to all users).
This feature is also cool, even though it's just a banner with custom text output. However, don't underestimate it; it can serve as a reminder that we are accessing the system and need to be cautious, especially in a production environment.
It helps us identify which system we are on and reminds us to proceed with caution. While on a development server, we may be more relaxed, but on a production server, we must be careful.
To create your own warning banner, you can follow the steps below:
Adding some decorator when you first remotely server
# vi /etc/motd
Change network settings to static
# vi /etc/sysconfig/network-scripts/ifcfg-ens33
 |
| make static IP on the server |
input some settings such as IP address, gateway, and others, like the picture above. then save & close.
Apply all configured
# reboot
Closing statement
Yes, that's the article "Configuration Before Building the Webserver on RHEL 7". It's straightforward. Feel free to comment below if you have any additional services that can be set up.
Maybe that's all I can share with you guys, hopefully, this article will be useful.
Thank You


Post a Comment for "Configuration Before Building the Webserver on RHEL 7"
Post a Comment